Monday, August 31, 2009
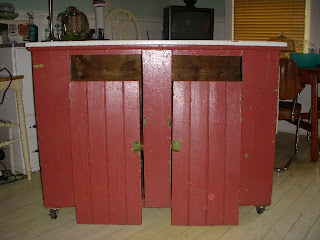
Cam's kitchen island
Here is a before and after of my friend Cam's kitchen island. Cam was going for the aged and distressed look so after hours of paint stripping, painting, distressing and polishing the transformation is obvious. Hope Cam likes it as much as I do.
Friday, August 28, 2009
Bed of flowers
About a year ago I found the images of this beautiful house in a magazine. I love it and its vintage flaire so much that the copy of the magazine is always close by to allow for a quick peek.Today I found out that the house is located in the Netherlands and is appropriately named the Bed of Flowers. The rooms are available for rent at very reasonable rates. Click here to visit the website.
Thursday, August 27, 2009
Brian Reiser photography
To me, Brian is not only an amazing photographer, he is a friend. Grown up in Montreal, his work bursts with charm and elegance of that city. Brian's portfolio covers food, people, products, places and much, much more. Included here are only snippets of his work. For more of Brian's photography and to learn more about this amazingly talented resident of Toronto check out his newly redesigned website.
Wednesday, August 26, 2009
Decorating with mirrors
I love mirrors and think they are awesome. They are not only functional, but can make a great home décor . Mirrors can be used to add light and space to the room. Their use is not limited to bathrooms, bedrooms and entryways. You can use them throughout the house, including kitchens for some added glitz and glamour. When choosing a place for a mirror, try to have it reflect something pretty, like a nice piece of art or your garden.
My favourite way to display mirrors (preferably of different shapes and sizes) is in groupings similar to an art wall arrangement. Each mirror will reflect part of your room and will render a different picture. You can introduce prints and paintings in this arrangement for some added visual interest.
A great source to look for different mirrors are your local vintage stores, flea markets and garage sales. Don’t worry if the mirror itself shows signs of age, in my mind this ads character. If the colour of the frame is not to your liking it can be easily changed with a fresh coat of paint.
Friday, August 21, 2009
Dinosaur Designs ... Hand made with love in Australia
One of the highlights of my trips Down Under are visiting the Dinosaur Design stores where you can find beautifully crafted jewelery and home wares. In the late 80's three young designers started experimenting with clear polyester resin that was originally cast in black and then hand painted. They have come a long way since then and today you can find their products in a wide range of colours.
Their fluid and organic shapes can be easily incorporated in the day to day life and their jewelery will certainly find a match with at least one of your outfits.Here is a small preview of their latest collection. Enjoy!
Wednesday, August 19, 2009
Miki's chair before and after
My friend Milana rescued this chair from the streets of Montreal some 9 years ago. Since then, this very much loved chair has seen a lot of traffic and started showing signs of age. Last week Milana ventured out to a fabric store and got this amazing fabric. I applied my sewing skills, et voilà, the chair looks happy again. If you have a similar project in mind, send me a note and I can help you out.
Tuesday, August 18, 2009
The colour purple
I got yet another fabulous piece of furniture over the weekend and while thinking about the appropriate colour for it, I came across this image at Beauty Comma Blog. I have this feeling that purple may become one of my staple colours for the fall.
Sunday, August 16, 2009
A thing of beauty
Thursday, August 13, 2009
Furniture painting tutorial
No matter how easy a job may seem, if you want to do it right you will need to put some effort into it. The same goes for painting. The secret lies in good preparation. Make sure that you work with quality tools, starting with paint, brushes and sealants. (Bad quality material will make your job far more difficult and the end result may not be up to your standards). Also, don’t forget to take your time, work at your own leisure and most importantly have patience and have fun!
TIP: If you are a novice, chose a smaller project, like a simple chair, desk or a stool. The simpler the lines, the greater chance at success.
1. Make sure that the surface is well prepped. Remove all the hardware and if you won’t be putting it back then fill all the holes with the wood filler. Remove any dirt, tape off the areas that you wish to protect, sand the piece, then sand it some more and prime if necessary.
Sandpaper comes in different grit designations - the lower the designation the coarser the paper. For most jobs using 120 grit paper will do, but for surfaces that were covered with several coats of paint I would resort to 100 or 80 grit. For more info on grit sizing click here.
Priming is optional, but if the surface is stained or if you want to achieve even finish throughout, I certainly recommend it. Before priming or painting, make sure that all the dust has been removed and that the surface is clean and smooth. The best way to ensure that the surface is clean is to use a tack cloth that you can find at your local hardware store.
2. Your surface is ready to receive the first coat of paint now. I usually put two coats of indoor latex paint, but if you think you need one more, go for it. You can use a small foam roller or a variety of brushes for your job. While rollers do a great job on larger surfaces, the brushes are excellent for cutting in all the corners and crevices. When purchasing brushes, talk to the sales people, describe your project and they will be able to give you a good advice.
TIP: In my experience, foam brushes tend to leave less brush marks and cause less drips then their “hairy” alternatives.
3. Between coats I sand the surface lightly with a 120 grit paper to make sure that the next coat of paint adheres better. Wait for the paint to dry completely before applying the sealant. If you are going for the distressed vintage look, use the sand paper to distress the surface in places where it would get most wear. I would not use a mechanical sander at this point as it does not allow for much control.
4. After you have achieved the desired look, you can proceed with protecting the surface.There is a variety of options out there of which I use the following two:
a)Clear water-based polyurethane finish – it dries quickly and provides good durability
b)Paste finishing wax - protects and adds lustre to any stained or finished wood surface (using wax finish will give your furniture a much softer look)
5. Once the top coat is dry, clean the surface once more with a lint free rag, remove all the tape and add hardware.
TIP: Wash your brushes, paint trays and rollers thoroughly after use. It will save you some $$ and a trip to the hardware store.
Et Voilà!, this concludes our furniture painting tutorial.
If you still believe that this is more than you are willing to cope with, give me a call or send me an email. I will be happy to help you with your next painting job.
TO RECAP: For your painting job you will need the following supplies:
Painter’s tape
Sand paper
Tack cloth
Primer
Paint
Paint tray
Rollers and brushes
Sealant
Tuesday, August 11, 2009
Work in progress
Monday, August 10, 2009
Weekend project
Friday, August 7, 2009
Cake plate anyone?
Made from carefully selected vintage and recycled dishware, these adorable and one-of-a-kind cake plates make a worthy tray to serve your home made cup cakes, fruit or cucumber and avocado sandwiches. Smaller version can be used as ring and jewelery plate in your bathroom or bedroom.
The price per plate is $20.00 CDN
Thursday, August 6, 2009
First Poppy
So here is my first Poppy that I have decided to share with you. This lamp was a true ugly duckling until I treated it to a can of glossy, glossy orange paint. I topped it off with a black lamp shade for some added drama (like the orange wasn't over the top enough). If you happen to stumble upon this post, drop me a line, let me know what you think.
Wednesday, August 5, 2009
All things yellow
Subscribe to:
Posts (Atom)